
Disclosure: This post contains some affiliate links. I may earn a small commission at no extra cost to you, supporting my blog and content creation. Thank you!
---
Recently, I had a delightful chat with some folks at a ceramic art show. As soon as I mentioned that I use air dry clay for my sculptures, they were intrigued. Questions like "You don't fire the clay at all? How does it work? Where can I get some?" aren't unusual, as air dry clays are relatively new to the art world. With that in mind, I'd like to share my knowledge and passion for this versatile medium.
Creative Paperclay is my go-to choice for most of my work, but the techniques I describe here can be used with various other artist-grade air dry clays. The best part about Creative Paperclay (CPC, for short) is that you don’t need any specialized tools to start creating beautiful art.
Two Basics to Begin Sculpting
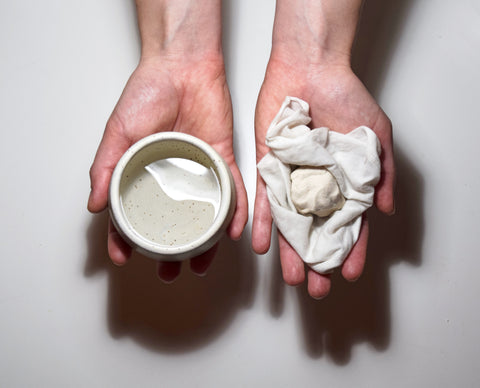
When working with air dry clays, there are two essentials: a small bowl or cup for water, and a lint-free rag.
- Small bowl: Air dry clays are water-based and need regular moistening to prevent drying and cracking. Find a bowl that's easy to dip your fingers into and won't tip over easily as you'll use it to moisten your fingers and tools.
- Lint-free rag: This cloth keeps pieces of clay from drying out when not in use, and it's also handy for wiping hands and tools.
What Tools and When
Remember, tools are based on personal preference and sculpting style. Tools that work for me may not be your cup of tea. Experimentation is key to finding your favourites. To help you get started, let's break down the tools by the tasks they're needed for: shaping, carving, and smoothing.
Tools for Shaping
Most of the shaping can be done using your fingers. When working in tight spots or creating details, metal and wooden ceramic/pottery tools are effective. Moisten wooden tools slightly before using them to prevent sticking.
Nail art tools, a trick I learned from polymer clay artists, are great for shaping as well. The round ends come in super handy to shape eye and nose holes with no sharp edges.
A note on tools: I prefer wooden tools, and ones made from darker wood (such as this one) are better as they tend to be smoother and thus less likely to stick to clay. However, it might be useful to purchase a well-priced kit with lots of different tools so you can try what works best for you. This set of sculpting tools even includes the nail art-type tools mentioned above.

My absolute go-to-tool: small paint brushes. They’re perfect for detail work, and can be used to both push/move clay also to smooth it out, especially in tight areas. I find filbert-shape brushes to be the best as they leave less of a mark in the clay.
Be careful not to over-wet the clay, as it may lose its ability to hold shape. Brushes should be moist, but not wet. This is when the moist cloth is handy: I dip a brush into water and then “dry” it off on the rag, providing just the right amount of moisture.
Tools for Carving & Cutting
CPC can be carved once dry, which is useful for reducing clay in an area and reshaping it. However, ensure your sculpture is thoroughly dry before cutting, or you'll just tear the clay.
A utility (or x-acto) knife is the primary tool I use for carving and cutting. Use safe carving techniques: CPC is quite hard once dry (imagine a soft wood) and you can cut yourself easily if you’re not careful. Make sure your blade is sharp.

An example of "faceting" made using a utility knife
I have 2 different types of utility knives on hand to tackle different jobs:
- A large Olfa utility knife - for cutting away large pieces on relatively accessible areas of a sculpting and general purpose cutting.
- A small hobby knife to get into tight spaces and cut details, especially around the face.
Tools for Smoothing
After finishing your sculpture, you might want to smooth certain areas. There are several approaches to smoothing air dry clays, including wet and dry techniques.

Raw, un-sanded sculptures. Notice the patchy texture from layering clay.
Wet Techniques for Smoothing Air Dry Clay
- Your fingers - Gently use your fingers to smooth the clay as you're working on it. Be cautious not to use too much water, as this may cause the clay to crack. This method won't produce an entirely smooth surface, as CPC can capture fine details such as fingerprints (yet another reason to love it!).
- A spoon - Utilize a smooth, hard tool like the back of a spoon to compress the texture and burnish the clay. This method works for both wet and dry clay. If used on dry clay, you can achieve a shiny finish, but it may tranfers some of the residue from the metal.
- Liquid clay - Mix a small amount of CPC with water to create a liquid paste, which can then be brushed onto the sculpture. Though this technique can be time-consuming and may not yield consistent results, it's a viable option when you need a smooth surface.
While the above are options, when I need real smoothness I go for ▼
Dry Techniques for Smoothing Air Dry Clay
- Sanding – I find this to be the most effective method to get a super smooth finish: Start with 60 grit and move up to 400 grit for a velvety smooth surface. Sanding can also create cool textures depending on the grit used. Just be cautious, as sanding is messy and should be done outdoors (and preferably with a mask on).

Sanding air dry clay is a messy business and best done outside
My essential tools for air dry clay sculpting:
- Small bowl
- Lint-free rag
- Wood sculpting tools
- Nail art tools
- Small brushes
- X-Acto knife
- Sandpaper (I use the following grits: 60, 80, 120, 200, 400)
Hopefully my sharing the essential tools and techniques for air dry clay sculpting will help to kickstart your sculpting journey. We covered shaping, carving, and smoothing, offering guidance for each stage. Remember, practice is key, so don't worry if your first sculpture isn't perfect. Keep experimenting and learning, and you'll soon unlock the creative potential of air dry clays. Dive in and let your imagination run wild!
What's Next?
Discover THE most essential tool for Creative Paperclay
Create your own air dry clay sculpture using the Sculpting Horses in ADC book