Disclosure: This post contains some affiliate links. I may earn a small commission at no extra cost to you, supporting my blog and content creation. Thank you!
---
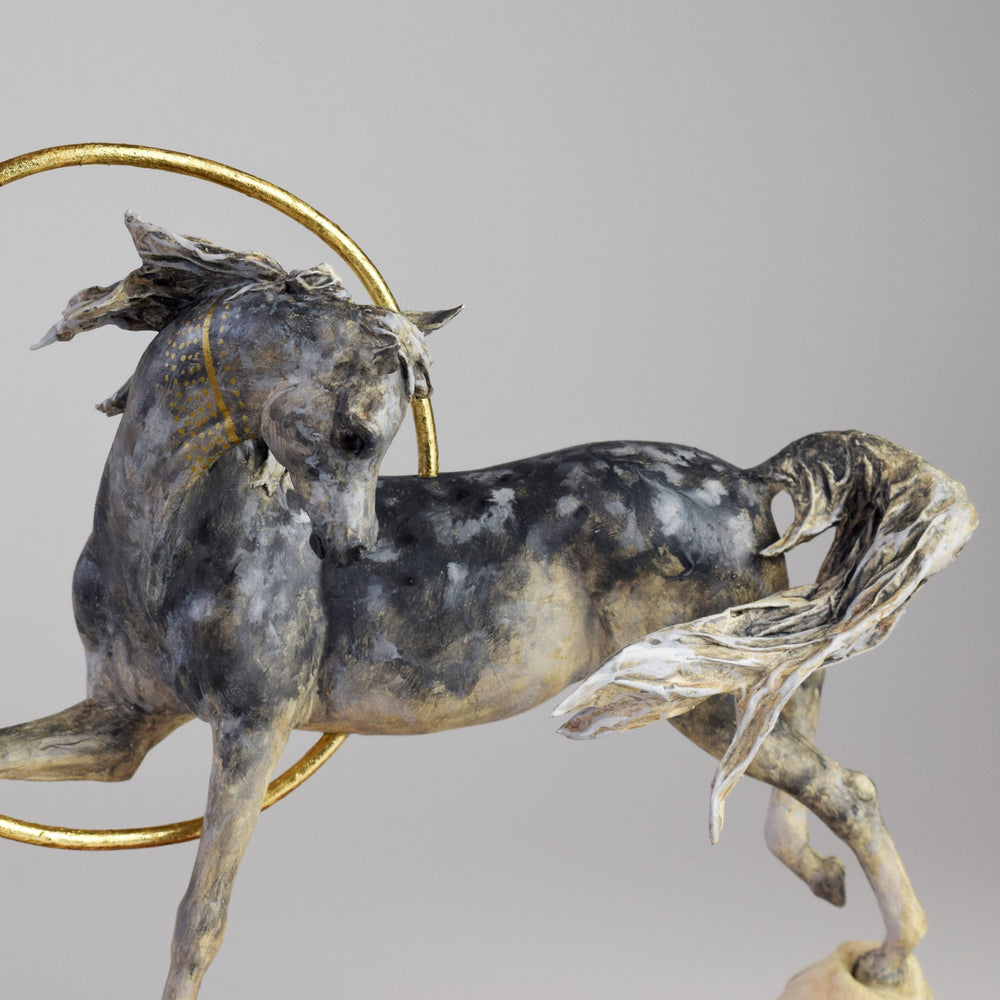
The versatility of air dry clay such as Creative Paperclay is truly remarkable, with one minor exception - sculpting fine, thin structures. Due to its nature, air dry clay boasts greater strength in bulkier forms. What, then, is the solution when we wish to sculpt something delicate and wispy, akin to a horse's tail? Enter a surprising ally in sculpting: paper.
That's correct - plain old paper. Leveraging its flexibility, paper can actually help prevent cracking when used correctly. With the right techniques and materials, paper evolves into a surprisingly robust medium for sculpting.
Sculpting Essentials
- Paper
- A glueing agent
- Wire mesh
Let's delve into the specifics of these supplies.
The Power of Paper
The ideal choice for this purpose is Japanese kozo (mulberry) paper. Known for its strength, translucency, and absorbency - all vital for crafting thin forms - kozo paper, however, is on the pricier side.
Still, most lightweight papers will suffice. Your standard white printing paper might not be the best choice due to the absence of strengthening fibers. Instead, opt for papers usually employed for papier mache, like newsprint, that can readily absorb glue.
In the past, I've also experimented with tissue papers, although their extreme thinness and tendency to become difficult to handle once glued can pose challenges.
The Gluing Agent
A basic white glue is the most accessible option. Diluting it with some water enables easier absorption by the paper. However, remember not to overdo the dilution, or it won't harden adequately. A recommended ratio would be 1:3 water to glue.
Mixed media artist Forest Rogers introduced me to using an acrylic medium like soft gel to secure paper to a surface. While less tacky than glue, it's more transparent, archival, and more forgiving during application.

Archival enthusiasts might also appreciate methyl cellulose powder. This plant-based glue is entirely archival, commonly used in bookbinding. Note that methyl cellulose can reactivate when exposed to water even after drying, so it requires sealing. It also serves as a great papier mache medium.
Wire Mesh
Acting as the structure's backbone, the wire mesh is crucial when sculpting with paper. Finer mesh results in stronger thin forms. The paper essentially enhances and provides body to the wire mesh. Unfortunately, the wire mesh can be challenging to find and rather expensive.

Crafting Technique
First, shape your wire mesh armature. If you're crafting a horse tail (or perhaps wings?), mold it and secure it to your primary armature.
Glue can be applied in two ways:
1) Dip the paper into the glue solution, remove excess using your fingers, and drape over the armature,
or
2) Roughly position the paper over your armature, then paint the glue over top with a brush, ensuring thorough soaking.
The second method generally affords more precision, but it could vary depending on your paper choice and technique. Tearing the paper into manageable strips might prove helpful.
Allow it to dry. To achieve significant strength, multiple layers might be required.

The Final Piece
With your sturdy yet thin base ready, you can layer clay on top of this armature to bulk out certain areas as needed. This combination creates a useful and interesting effect!
Embark on your sculpting adventure now, and enjoy the process!
What's Next?
Learn about the fundamental aspects of air dry clay
Explore the crucial role of armatures in air dry clay sculpting