For those of you wondering how an air dry clay sculpture comes together, look no further!
With so little information on air dry clays, I hope my work will help other artists to employ these amazing mediums for their artwork, and to help art collectors gain a deeper understanding of the work they're acquiring.
A bit about the material
I use an artist-grade product called Creative Paperclay that's made in Japan and has a non-toxic, paper base. It's strong and dries to the hardness of a soft wood that can be sanded, carved, and painted.
The following is a brief walk-through of the process I use when hand-building my unique air dry clay sculptures.
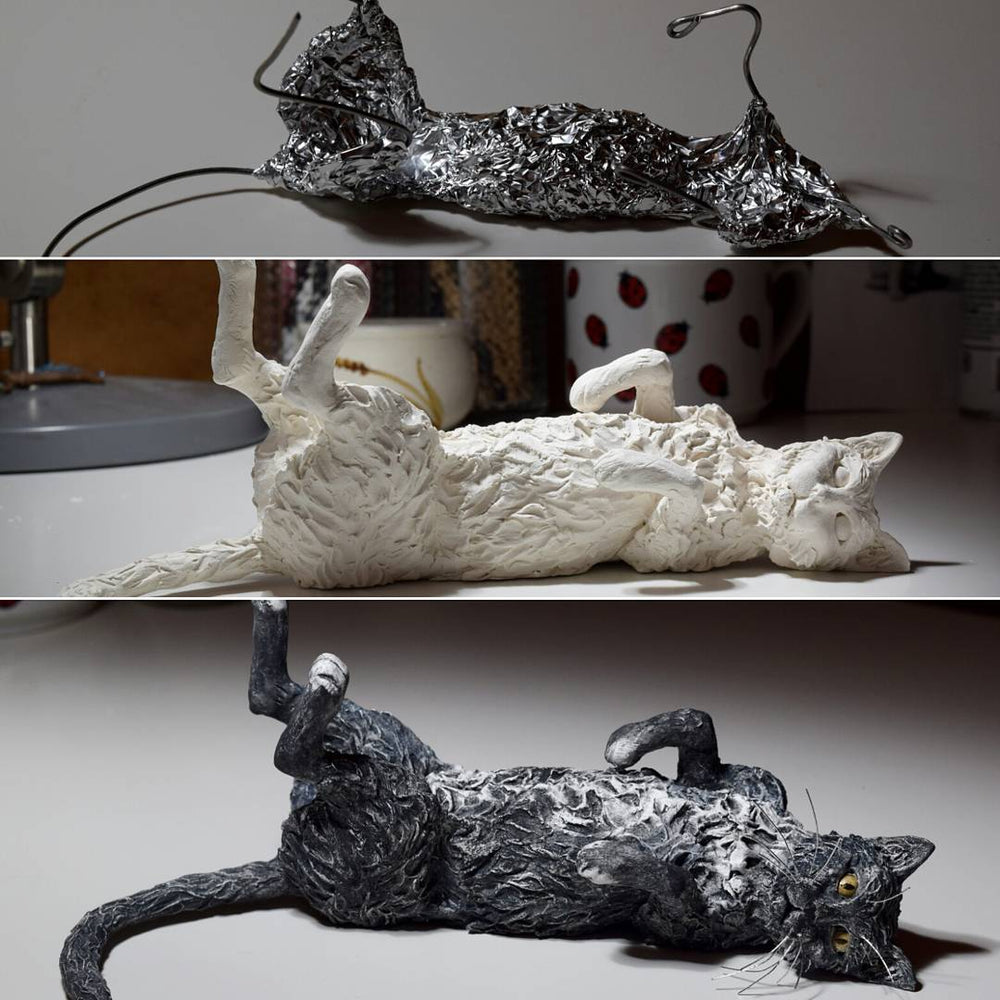
1. Armature

After deciding on the pose of my animal, I get to work constructing an armature. I typically use aluminium armature wire because it bends easily and won't rust. Where the wire meets other wires I twist it around and then further secure it using glue.
2. Bulking out

In order to keep the sculpture stronger (by not having to support an excessive amount of clay) and lightweight, I bulk out the armature. For smaller sculptures this is usually done with aluminium foil, for larger ones I often employ polystyrene and other lightweight materials.
3. Clay layering

After I'm satisfied with the armature, I add my first layer of clay (or epoxy clay depending on how much strength the sculpture requires) and make sure it's totally dry before adding more. This ensures less cracking and that my sculpture has a strong base on which to develop.
4. Sculpting

This is the stage when the sculpture actually starts to look like the thing it's supposed to. At this stage, I often work in sections as well as layers.
After I finish the sculpture, I ensure it is fully dry (sometimes waiting for up to a week) before going onto the next step.
5. Priming
I always apply a layer, or several, of gesso, a artist primer, (just like a painter would use on their canvas) to ensure that the clay is sealed and the paint will adhere properly. Read more about priming air dry clay sculpture.
6. Painting

I use a variety of painting mediums on my sculptures. Because I tend to work fast, I use acrylic based products, but I also use raw pigment powders, gold leaf and other mixed media.
On this particular cat sculpture, I used specially formulated Acryla Gouache paints by Holbein that create wonderful watercolour effects.
Depending on the thickness of the paint, it should be allowed to cure for at least 2 days before moving to the last stage.
7. Varnishing

I prefer to seal my sculptures with an archival varnish to protect them from dust and UV rays.
I like to mix and match finish types: I usually varnish the eyes with several layers of high gloss varnish even though the body of the sculpture is matte. I find it brings the animal sculptures to life.
The varnish should be left to fully cure in a warm, dust-free environment for at least 3 days. Discover more about varnishing your sculptures.
8. Base addition

My air dry clay sculptures are mounted on a variety of bases. Some are mounted on wood, while some just have a felt bottom to protect them from scratches.
Each sculpture is a unique piece of work, and so this is only an overview of the basic process that goes into making one from the beginning. I'll continue to share my ideas and techniques as I go, so please check back again soon for some fresh inspiration.
What's Next?
Create your own air dry clay sculpture
Read about the secrets of sculpting with Creative Paperclay